Showing posts with label hair. Show all posts

Friday, January 13, 2012

Ponytail Veil (hairstyle)

Hey everybody!
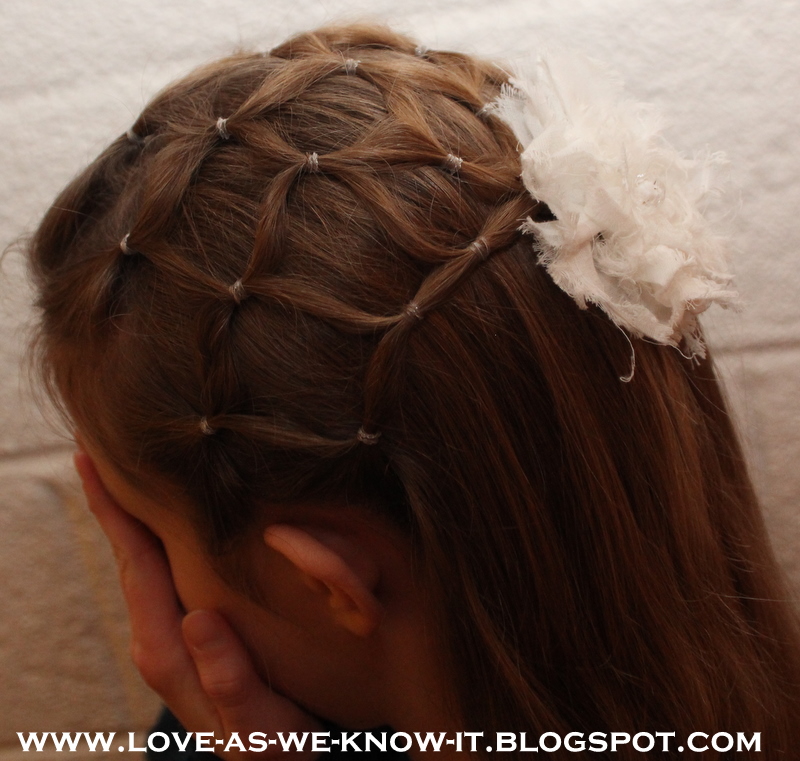
Today I'm going to show you a hairstyle that's called a Ponytail Veil. It's really simple and really easy. All you need is a LOT of tiny clear elastics!
Although a rat-tail comb wouldn't hurt.


Start off by taking your front section and clipping the rest of your hair back


Now, let's get started!
1-divide your front section into 6 sections.
2-put a clear elastic on the end of the section,
make it tight and (to avoid puffy-ness) as close to the scalp as you can.
3-take a section and split it in half. Take another section next to it and split it in half too.
4-Bring them together and fasten with a clear elastic.
 

Continue doing this until your veil covers as much of your hair as you like. It should look a little bit like this:


 I wanted to kick it up a notch, and added a flower at the bottom. I absolutely love this, even though I say so myself :)

What I love about this is that you can do so much with it.  If you're going somewhere fancy you could do a low bun, a chignon or simply curl the rest of your hair!

Thanks for reading!
-H


Saturday, January 7, 2012

Head jewelry DIY

Hey guys!
I have an exciting do-it-yourself project.
I'm going to show you how I made a piece of head jewelry out of
3 old necklaces. they were broken anyways:


These pictures inspired me:


and my favorite..


To start you'll need :
-3 old necklace-chains. They don't have to look exactly the same. Mine are all different, and I love it)
-a jump ring
-some kind of stone, or anything you want really:)
-something to close the jump ring and to cut the chains


Next you should thread the chains up on the jump ring and close it

Then you have to adjust the length of the chains so that the "sides" will be just a little bit shorter (in my case). Just make sure not to cut them too short! Then you have to tie them together at the back. It doesn't really matter if it doesn't look perfect cause no one will really see it as long as you don't put it on backwards ;)

Last but not least, I glued a pretty little stone in the middle :)


So there you have it! It takes about 5-10 minutes -after you find necklaces-
and then you just have to let the clue dry.

I absolutely love this. Especially the fact that it cost me absolutely nothing!

Sunday, January 1, 2012

The Waterfall Braid

Hey guys!
I'm going to show you a hairstyle I did this morning, the waterfall braid. It's not very complicated but I had to do this a couple of times before I got it right!

Here is a link to a youtube-video that shows you excactly how to do the braid:
http://www.youtube.com/watch?v=VkUo6JQud_o

Anyways,
my little sister -whom I love to death- was going to a birthday party and I decided to do the waterfall braid on both sides, connecting them at the back :)

-First, divide your hair evenly into two sections, since you will be doing the braid on both sides.


-Then make three sections on one side of your head.
Make sure not to do this too low.


-Then just braid away! I found it very useful to have her hold the sections I "dropped".


-Then I did the same on the other side of her head but you could just leave it like that.


-Then I took a clear elastic and connected the two braids. I think that if you'd braid from there down, it look really good too!


If you want to curl your hair, I'd recommend
doing so at this point :)
Have fun!
-H